08 Containers: Docker and Apptainer
Ship the whole software stack, operating system included, built from the same lock file
- Time: three sessions: Docker (sections 1 to 4), building an image from the lock file (5 to 7), and a lab (run the LTEE pipeline in your image; optional Apptainer on your cluster). Sharing and provenance (8, 9) at home.
- Slides: Containers
- You need: Docker (lesson 00), the
ltee-projectafter lesson 05. Apptainer is optional and Linux-only. - You will have: a Docker image of the LTEE pipeline environment, built from
pixi.lock, that runs the pipeline on any computer with Docker.
Overview
pixi.lock pins every package, but not the operating system underneath: the C library, system tools, the kernel interface (lesson 05, “What the lock file does not pin”). A container packs the software and a minimal operating system into one image file. Run the image anywhere Docker (or Apptainer) runs, and the program sees the same files every time.
Two tools in this lesson:
- Docker builds and runs images on laptops (macOS, Windows, Linux) and on GitHub Actions. It needs a background service with administrator rights, which is why clusters do not allow it.
- Apptainer (formerly Singularity; SingularityCE is a separate fork by Sylabs) runs the same images on HPC clusters, as a normal user. It is Linux-only: use it on Linux, in WSL2, or on your cluster.
We do not write a second recipe for the software: the image is built from pixi.lock, so the container and your laptop cannot drift apart.
Learning outcomes
After this lesson you can:
- Run commands in a container from a public image, interactively and with your project folder mounted.
- Build an image of a Pixi environment from its lock file, and explain each line of the Dockerfile.
- Run the LTEE pipeline inside the container and show that it gives the same variant calls as on your laptop.
- Archive and share an image with a version tag and record its digest (provenance).
- (Linux, WSL2 or cluster) Convert the image for Apptainer and run it without root.
Checks: docker run ... ltee-project:0.1.0 reproduces your variant counts (outcomes 2, 3); the image digest is recorded in your README (4); the CI job builds and runs the image on every push (2, 3).
1. Is Docker running?
Start Docker Desktop (macOS, Windows) or the Docker service (Linux), then:
docker --version
docker run --rm hello-world
docker run IMAGE downloads the image if needed, starts a container from it, runs its default command and stops. --rm deletes the stopped container afterwards (the image stays). If you see “Hello from Docker!”, you are ready.
2. Run a command in a container
Run a command in a plain Ubuntu image:
docker run --rm ubuntu:24.04 cat /etc/os-release
docker run --rm ubuntu:24.04 bash -c "samtools --version || echo 'no samtools in plain Ubuntu'"
The container has its own file system: Ubuntu 24.04, whatever your laptop runs. It does not have your tools or your files.
Interactively (-it gives you a terminal inside; exit leaves):
docker run --rm -it ubuntu:24.04 bash
ls /
exit
3. Your files inside the container: bind mounts
A container sees only its own files unless you mount a folder of your computer into it with -v HOST_FOLDER:CONTAINER_FOLDER. Mount the project at /work and start there (-w /work):
cd ~/cbio7501/ltee-project
docker run --rm -v "$PWD":/work -w /work ubuntu:24.04 ls metadata
docker run --rm -v "$PWD":/work -w /work ubuntu:24.04 head -2 metadata/samples.tsv
Files the container writes into /work appear in your project folder and stay after the container is gone. Everything else it writes disappears with it.
4. Images, tags and digests
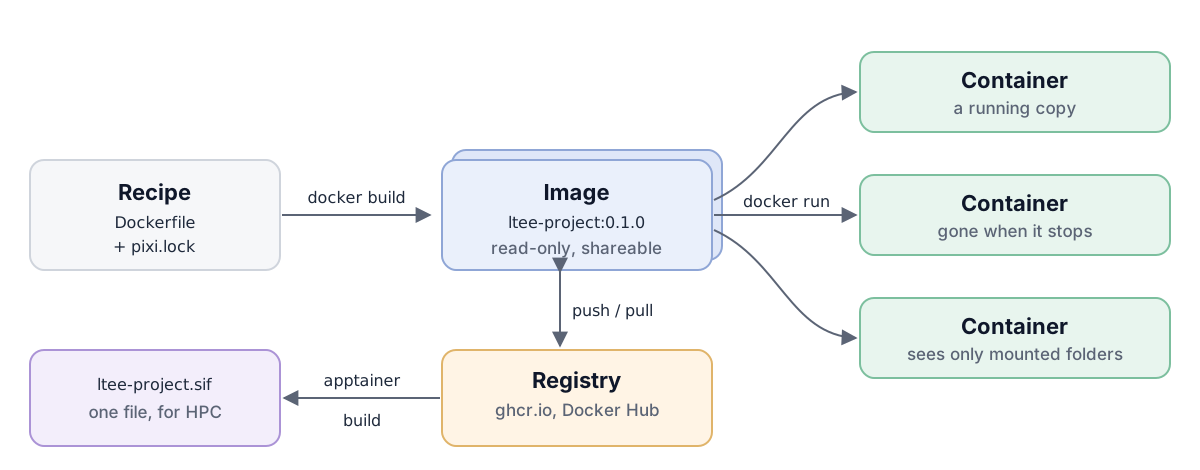
pixi.lock) is built into an image; containers are running copies of it; registries store and share images; Apptainer turns an image into one .sif file for clusters. Diagram: Reproducible and Open Science lessons, CC BY 4.0.docker images
docker image inspect ubuntu:24.04 --format '{{.Id}}'
docker image inspect ubuntu:24.04 --format '{{index .RepoDigests 0}}'- A tag (
24.04,latest) is a name that its owner can move to a new image tomorrow. - A digest (
ubuntu@sha256:...) is the checksum of the image content: it never changes. For full reproducibility, record and use digests, like the checksums of your data (lesson 03).
5. An image of the LTEE environment, from pixi.lock
The template already put two files in your project: containers/Dockerfile and .dockerignore. Read the Dockerfile:
cat containers/DockerfileWhat each part does:
- Two stages. The
buildstage starts from Pixi’s official image (ghcr.io/prefix-dev/pixi:0.83.0), copies onlypixi.tomlandpixi.lock, and runspixi install --locked, so the image gets exactly the packages in your lock file, or the build fails. This is the pattern the Pixi documentation recommends. - An activation script.
pixi shell-hookwrites the commands that activate the environment (paths, Java for FastQC, Quarto’s settings) into/entrypoint.sh, which runs before every command. - A small final image. The
productionstage starts from plainubuntu:24.04and copies in only the environment and the script. Pixi itself is not in the final image. The environment keeps its original path, because environments cannot be moved (you saw that error in lesson 05). ENV_NAMEchooses which Pixi environment goes in; we wantpipeline.
.dockerignore keeps data, results and your local .pixi/ out of the build:
cat .dockerignoreBuild the image (several minutes the first time). Run it from the project folder; the final . means “this folder is the build context”:
docker build --platform linux/amd64 -f containers/Dockerfile \
  --build-arg ENV_NAME=pipeline -t ltee-project:0.1.0 .
docker images ltee-project--platform linux/amd64?
Containers run Linux. Your lock file has Linux packages for linux-64 (Intel and AMD processors) only, because bioconda builds for ARM Linux are less complete. On a Mac with Apple silicon, Docker would otherwise build an ARM Linux image (linux/arm64), and pixi install --locked would stop because the lock file has no packages for it. --platform linux/amd64 builds the Intel image; Docker Desktop runs it through emulation (slower, but the same result). On an Intel laptop, a Windows PC or GitHub Actions the flag changes nothing.
Check the tools in the image:
docker run --rm ltee-project:0.1.0 samtools --version
docker run --rm ltee-project:0.1.0 fastqc --version
docker run --rm ltee-project:0.1.0 bwa 2>&1 | grep Version
Compare with your laptop: the versions are the same, because both come from pixi.lock.
pixi run -e pipeline samtools --version | head -16. Run the pipeline in the container
Mount the project and run the variant-calling script inside the container. The data is already in data/raw/ from lesson 03. The container writes its results into your results/ folder, replacing the ones from lesson 05:
docker run --rm --platform linux/amd64 -v "$PWD":/work -w /work ltee-project:0.1.0 \
  bash scripts/run_variant_calling.sh
for f in results/vcf/*_final_variants.vcf; do echo "$f $(grep -vc '^#' "$f")"; done
results/vcf/SRR2584863_final_variants.vcf 25
results/vcf/SRR2584866_final_variants.vcf 775
results/vcf/SRR2589044_final_variants.vcf 10Same counts as on your laptop (lesson 05). Two different operating systems, one lock file, the same answer.
On Linux, files written by a container belong to root by default. Add --user "$(id -u):$(id -g)" to docker run so they belong to you. Docker Desktop on macOS and Windows handles this for you.
7. Apptainer (Linux, WSL2 or a cluster)
Apptainer runs Docker images on clusters without root. Convert your local Docker image to an Apptainer image file (.sif):
apptainer build containers/ltee-project.sif docker-daemon://ltee-project:0.1.0Or, on a cluster without Docker, from the registry after step 8:
apptainer build containers/ltee-project.sif docker://ghcr.io/ada-lovelace/ltee-project:0.1.0Run commands in it. Apptainer mounts your home folder and the current folder automatically, so no -v is needed:
apptainer exec containers/ltee-project.sif samtools --version
apptainer run containers/ltee-project.sif bash scripts/run_variant_calling.sh
apptainer run uses the image’s start script (the activated environment); apptainer exec runs a command directly, which works because the Dockerfile also puts the environment on PATH. On a cluster, submit it like any job, for example srun -A <project> -t 00:30:00 apptainer run .... The file containers/apptainer.def is a recipe that builds the same .sif from the registry image, for clusters where you prefer a recipe file.
9. Provenance: which image made this result?
Record, in the README or the report, the digest of the image you used:
docker image inspect ltee-project:0.1.0 --format '{{.Id}}'After pushing, docker image inspect ghcr.io/ada-lovelace/ltee-project:0.1.0 --format '{{index .RepoDigests 0}}' gives the registry digest (ghcr.io/...@sha256:...), which anyone can pull exactly with docker pull ghcr.io/ada-lovelace/ltee-project@sha256:.... Together with the Git commit (lesson 04) and the data checksums (lesson 03), it pins every input of the analysis.
Break it: forgetting the bind mount
Run the pipeline without mounting the project:
docker run --rm ltee-project:0.1.0 bash scripts/run_variant_calling.shbash: scripts/run_variant_calling.sh: No such file or directoryThe image has the software, not your project. Without -v "$PWD":/work, the container starts in an empty /work. This is the most common container mistake; the second most common is the opposite, writing results somewhere that is not mounted and losing them when the container stops.
A Dockerfile with RUN apt-get install samtools gets whatever version Ubuntu ships that day, usually older than bioconda’s, and a different one next year. A container is only as reproducible as its recipe. Building from pixi.lock is what makes ours exact.
Save your work
git switch -c lesson-08-containers
printf '\n## Container\n\nDocker image built from pixi.lock: `docker build --platform linux/amd64 -f containers/Dockerfile --build-arg ENV_NAME=pipeline -t ltee-project:0.1.0 .`\n' >> README.md
git add README.md
git commit -m "Document how to build the container image"
git push -u origin lesson-08-containers
Open a pull request and merge it as usual.
Troubleshooting
| Problem | What to do |
|---|---|
Cannot connect to the Docker daemon |
Docker is not running: start Docker Desktop, or sudo systemctl start docker on Linux. |
permission denied ... docker.sock (Linux) |
Add yourself to the docker group (Docker’s post-install steps), log out and in. |
pixi install --locked fails in the build with a platform error |
You built without --platform linux/amd64 on an ARM computer (step 5). |
lock file not up-to-date in the build |
Run pixi install on your laptop, commit pixi.lock, build again. |
| The build is very slow on a Mac | Emulating linux/amd64 on Apple silicon is slow. Build once and reuse the image, or build in GitHub Actions. |
No space left on device during build |
Docker keeps old images and build cache: docker system prune (read what it removes first). |
apptainer: command not found |
Apptainer is Linux-only: use WSL2, a Linux machine or the cluster, where it is often a module (module load apptainer). |
FATAL: ... user namespaces (Apptainer) |
Your Linux system blocks unprivileged user namespaces; ask the administrator. |
Apply it to your own project
Build an image of your own project’s environment with the same Dockerfile (--build-arg ENV_NAME= the environment your analysis uses), run your reproduce steps in it with your project mounted, and write the build command and the image ID in your README.
Key points
- An image packs software and a minimal operating system; a container is a running image.
-v "$PWD":/workmounts your project; without it the container cannot see your files.- Build images from
pixi.lock, so container and laptop run identical packages. - Tags can move; digests cannot. Record the digest of the image behind your results.
- Docker for laptops and CI; Apptainer for clusters, from the same image.
Further reading
- Cheat sheets: Docker and Apptainer, with links to the official cheat sheets and references.
- NBIS, Working with containers (including Seqera containers and multi-platform builds): https://nbisweden.github.io/workshop-reproducible-research/pages/containers.html
- Pixi documentation, Containerizing: https://pixi.prefix.dev/latest/deployment/container/
- Apptainer user guide: https://apptainer.org/docs/user/latest/
- Docker documentation, Get started: https://docs.docker.com/get-started/
- Nüst D, Sochat V, Marwick B, et al. (2020). Ten simple rules for writing Dockerfiles for reproducible data science. PLoS Comput Biol 16:e1008316. https://doi.org/10.1371/journal.pcbi.1008316