04 Git and GitHub
Put the LTEE project under version control, share it on GitHub, and let GitHub rerun it for you
- Time: two sessions: sections 1 to 6 (80 minutes: Git on your laptop and on GitHub), then 7 to 10 (70 minutes: branches, a merge conflict, pull requests and tags). Boxes marked Going further are optional.
- Slides: Git and GitHub
- You need: the
ltee-projectfrom lesson 02 and the lesson 03 hands-on; Git and a GitHub account with an SSH key (lesson 00), or the HTTPS route in step 6. - You will have: your project on GitHub, with a history, a merged pull request, a
lesson-04tag, and a check from GitHub Actions on every push.
Overview
Version control records every change to your project: what changed, when, who did it and why. It lets you go back to any earlier state, try ideas on a branch without risk, and work with others without emailing files. Git is the standard tool; GitHub hosts Git repositories online and adds pull requests, issues and automation (GitHub Actions).
For reproducibility, Git answers the question “which version of the code made this result?”. Combined with metadata/checksums.sha256 (which data, lesson 03) and pixi.lock (which software, lesson 05), it pins down the whole analysis. Git comes first because everything you make from now on deserves a history.
Learning outcomes
After this lesson you can:
- Track a project with Git: stage and commit related changes with clear messages, and keep data and generated files out with
.gitignore. - Inspect and restore history: see what changed, and recover a file you deleted.
- Use branches to develop a change separately, merge it, and resolve a merge conflict.
- Publish the project on GitHub and propose changes through a pull request.
- Read the result of an automatic check (GitHub Actions) on a pull request.
Checks: your GitHub repository shows the history, a merged pull request, the lesson-04 tag and a green Reproduce check (outcomes 1, 3 to 5); the Break it exercise restores deleted work (outcome 2).
1. Is Git set up?
git --versionGit needs your name and email for every commit. If you did not do this in lesson 00, do it now:
git config --global user.name "Ada Lovelace"
git config --global user.email "ada@example.org"
git config --global init.defaultBranch main
Use the email of your GitHub account, so that GitHub links your commits to you. The email is written into every commit, and anyone can read it once you push to a public repository. To keep your address private, use the noreply address that GitHub shows under Settings → Emails (it looks like 12345678+ada-lovelace@users.noreply.github.com).
2. Start tracking the project
Go to the project and turn it into a Git repository:
cd ~/cbio7501/ltee-project
git init
git status
git init creates a hidden .git/ folder that holds the whole history. git status is the command you will use most: it tells you what Git sees.
On branch main

No commits yet

Untracked files:
  (use "git add <file>..." to include in what will be committed)
	.dockerignore
	.gitattributes
	.github/
	.gitignore
	CITATION.cff
	LICENSE
	README.md
	config/
	containers/
	data/
	...
What is not listed, and why
Look carefully: the FASTQ files you downloaded in lesson 03 are missing. The template’s .gitignore tells Git to ignore them, and also files that do not exist yet: software environments (.pixi/), results, rendered reports. Ask Git why it ignores a path:
git check-ignore -v data/raw/fastq/SRR2584863_1.trim.sub.fastq .pixi/ results/vcf/SRR2584863_final_variants.vcf.gitignore:6:data/raw/** data/raw/fastq/SRR2584863_1.trim.sub.fastq
.gitignore:2:.pixi/* .pixi/
.gitignore:11:results/** results/vcf/SRR2584863_final_variants.vcfThe rule of thumb: commit what a person wrote; do not commit what a program can rebuild or download. Raw data is downloaded by scripts/download_data.py (lesson 03); environments are rebuilt from pixi.lock (lesson 05); results and reports are made by code. Git is also not made for large files: the FASTQs alone are 350 MB. Large data belongs in a data repository (Zenodo, or SRA and ENA for reads), with the script that downloads it in Git. Tools such as Git LFS and DVC keep large files next to the code; this course does not need them.
3. The first commit
A commit is a snapshot. Git works with three places:
- the working copy: the files in your folder, which you edit;
- the staging area: the changes you have chosen for the next commit;
- the repository: the history of commits, kept in
.git/.
You stage changes with git add, then commit them with a message. git status compares the three places: it lists changes not yet staged, changes to be committed, and files Git does not track.
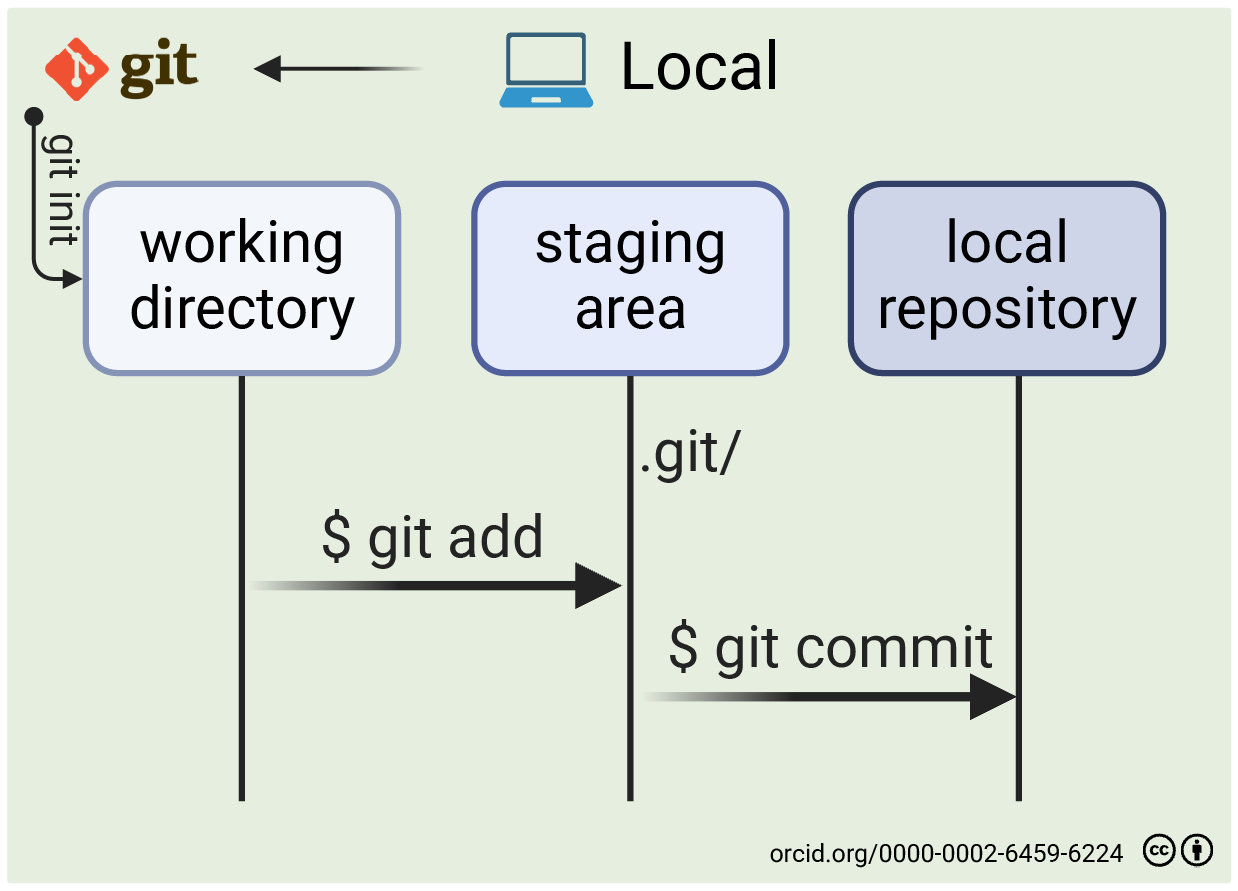
git add, and from there into the repository’s history with git commit. Figure: Created by Aziz Khan, CC BY 4.0.One file is still missing. The template includes a GitHub Action (step 9) that rebuilds the project’s software environment from a lock file, which records the exact version of every package. Create it now; it takes a few seconds and installs nothing (it prints the packages it recorded):
cd ~/cbio7501/ltee-project
pixi lock
Lesson 05 explains what is in it. For now, the rule: pixi.lock is committed together with pixi.toml, because together they say which software the code ran with. The template’s .gitattributes file tells Git how to treat some files: pixi.lock is generated, so Git does not merge it line by line or show it in diffs, and shell scripts keep Linux line endings, even on Windows.
git add .
git status
git commit -m "Create LTEE project with data download and metadata"
git status now lists every file under Changes to be committed, and the commit prints its ID (yours differs) and a summary:
[main (root-commit) 131b0d8] Create LTEE project with data download and metadata
27 files changed, ...Write the subject line in the imperative (“Add”, “Fix”, “Remove”), under about 50 characters, with no full stop: “Add GC content to read table”. If the change needs explaining, add a blank line and a body that says what and why (the code already says how). A commit should be one logical change: easy to describe, easy to undo.
4. Change, inspect, commit
Add a sentence at the end of README.md that says what the project is for, for example “Practice project from the Reproducible and Open Science lessons.” Use your editor, or append it from the terminal:
printf '\nPractice project from the Reproducible and Open Science lessons.\n' >> README.mdgit status
git diffgit status lists README.md under Changes not staged for commit. git diff shows what changed since the last commit: + lines were added, - lines removed. Here you see two + lines, an empty one and your sentence. Stage the change and look again:
git add README.md
git diff
git diff --staged
git commit -m "Say what the project is for in the README"
After git add, plain git diff shows nothing: the change has moved to the staging area. git diff --staged shows what the next commit will contain.
Stage only part of your work
Make two unrelated changes: a sentence in the metadata README, and a new file.
printf '\nThe reads were trimmed and subsampled by Data Carpentry.\n' >> metadata/README.md
printf 'Analysis notes for the LTEE project.\n' > docs/notes.md
git status
They belong in two commits. Stage and commit one at a time:
git add metadata/README.md
git commit -m "Mention trimming and subsampling in the metadata"
git add docs/notes.md
git commit -m "Start analysis notes"
If you staged something by mistake, git restore --staged FILE takes it out of the stage without changing the file. To stage only some of the changes inside one file, git add -p FILE shows each change and asks whether to stage it (y or n).
5. Browse the history
git log --oneline
git show --stat HEAD
git log --oneline -- metadata/README.md
e30b49e Start analysis notes
7e0af94 Mention trimming and subsampling in the metadata
a119186 Say what the project is for in the README
131b0d8 Create LTEE project with data download and metadatagit log --oneline: one line per commit, newest first. Each commit has an ID (a hash such ase30b49e; yours differ).git show --stat HEAD: what the latest commit changed.HEADis Git’s name for where you are now: the latest commit of the branch you are on.HEAD~1is the commit before it.git log -- FILE: only commits that touched that file.
Two more for later: git log -p -- FILE shows every change to a file as a diff, and git blame FILE shows, for each line, the last commit that changed it.
6. Put the project on GitHub
- On GitHub, click + → New repository. Name it
ltee-project, leave it empty (no README, no license, no.gitignore: you have them already), and choose Public or Private.
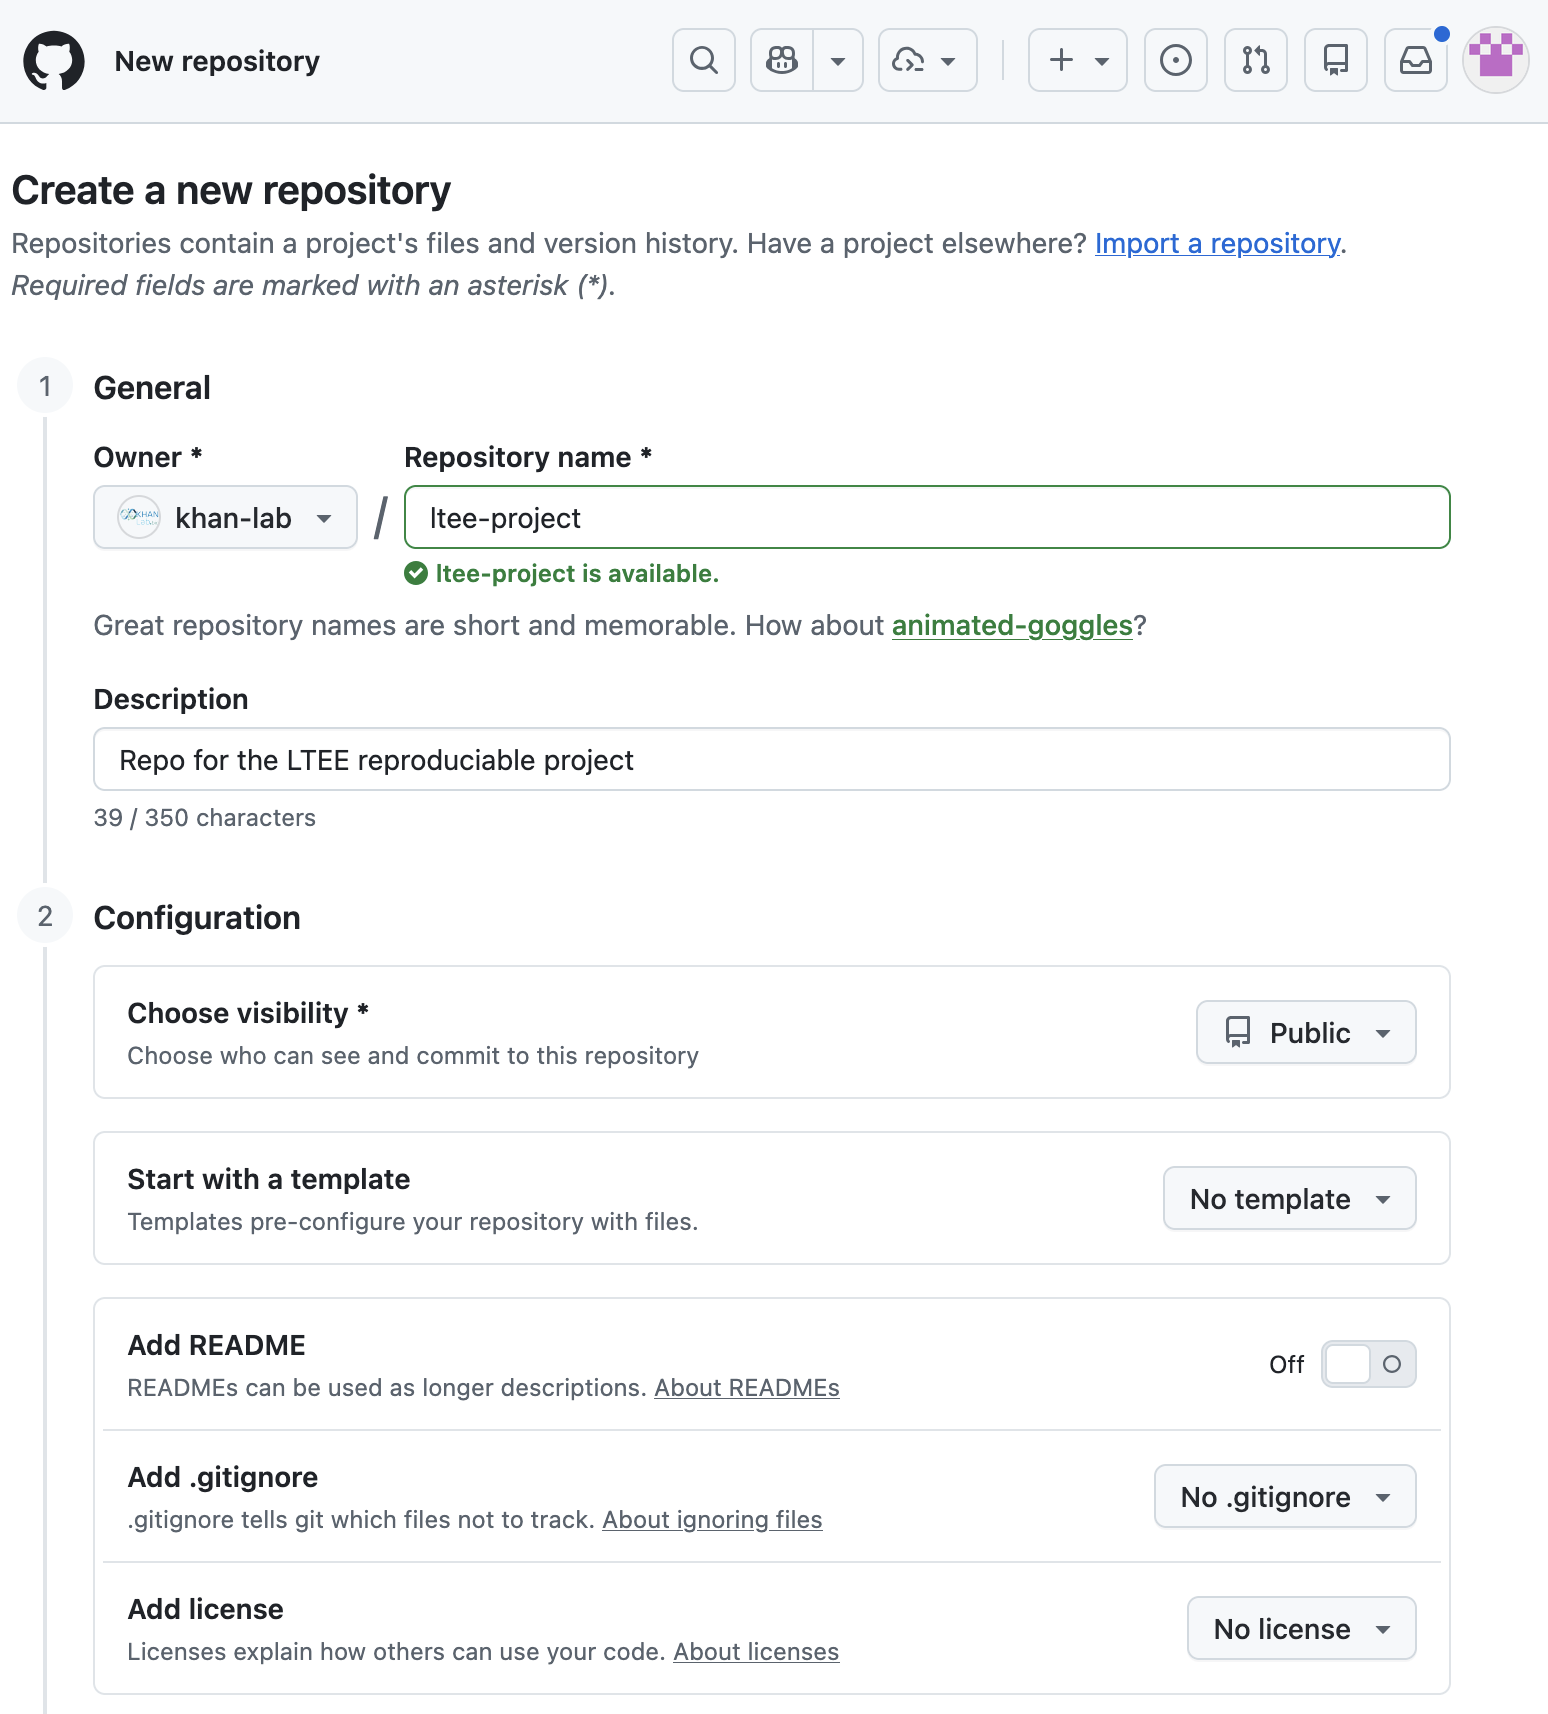
ltee-project on GitHub - https://github.com/new- GitHub shows the commands to connect an existing repository. Use the SSH version, with your user name instead of
ada-lovelace:
git remote add origin git@github.com:ada-lovelace/ltee-project.git
git push -u origin main
git remote -v
origin is the conventional name for “the copy on GitHub”; git remote -v shows where it points. -u remembers it, so later you only type git push and git pull. Reload the GitHub page: your files, your README and your history are there, and the data is not.
Some networks block SSH, and some computers make keys hard to set up. GitHub’s command line tool, gh, can log you in through the browser instead:
pixi global install gh
gh auth login
Answer GitHub.com, HTTPS, Yes (authenticate Git with your GitHub credentials) and Login with a web browser. Then use the HTTPS address in step 2:
git remote add origin https://github.com/ada-lovelace/ltee-project.git
git push -u origin main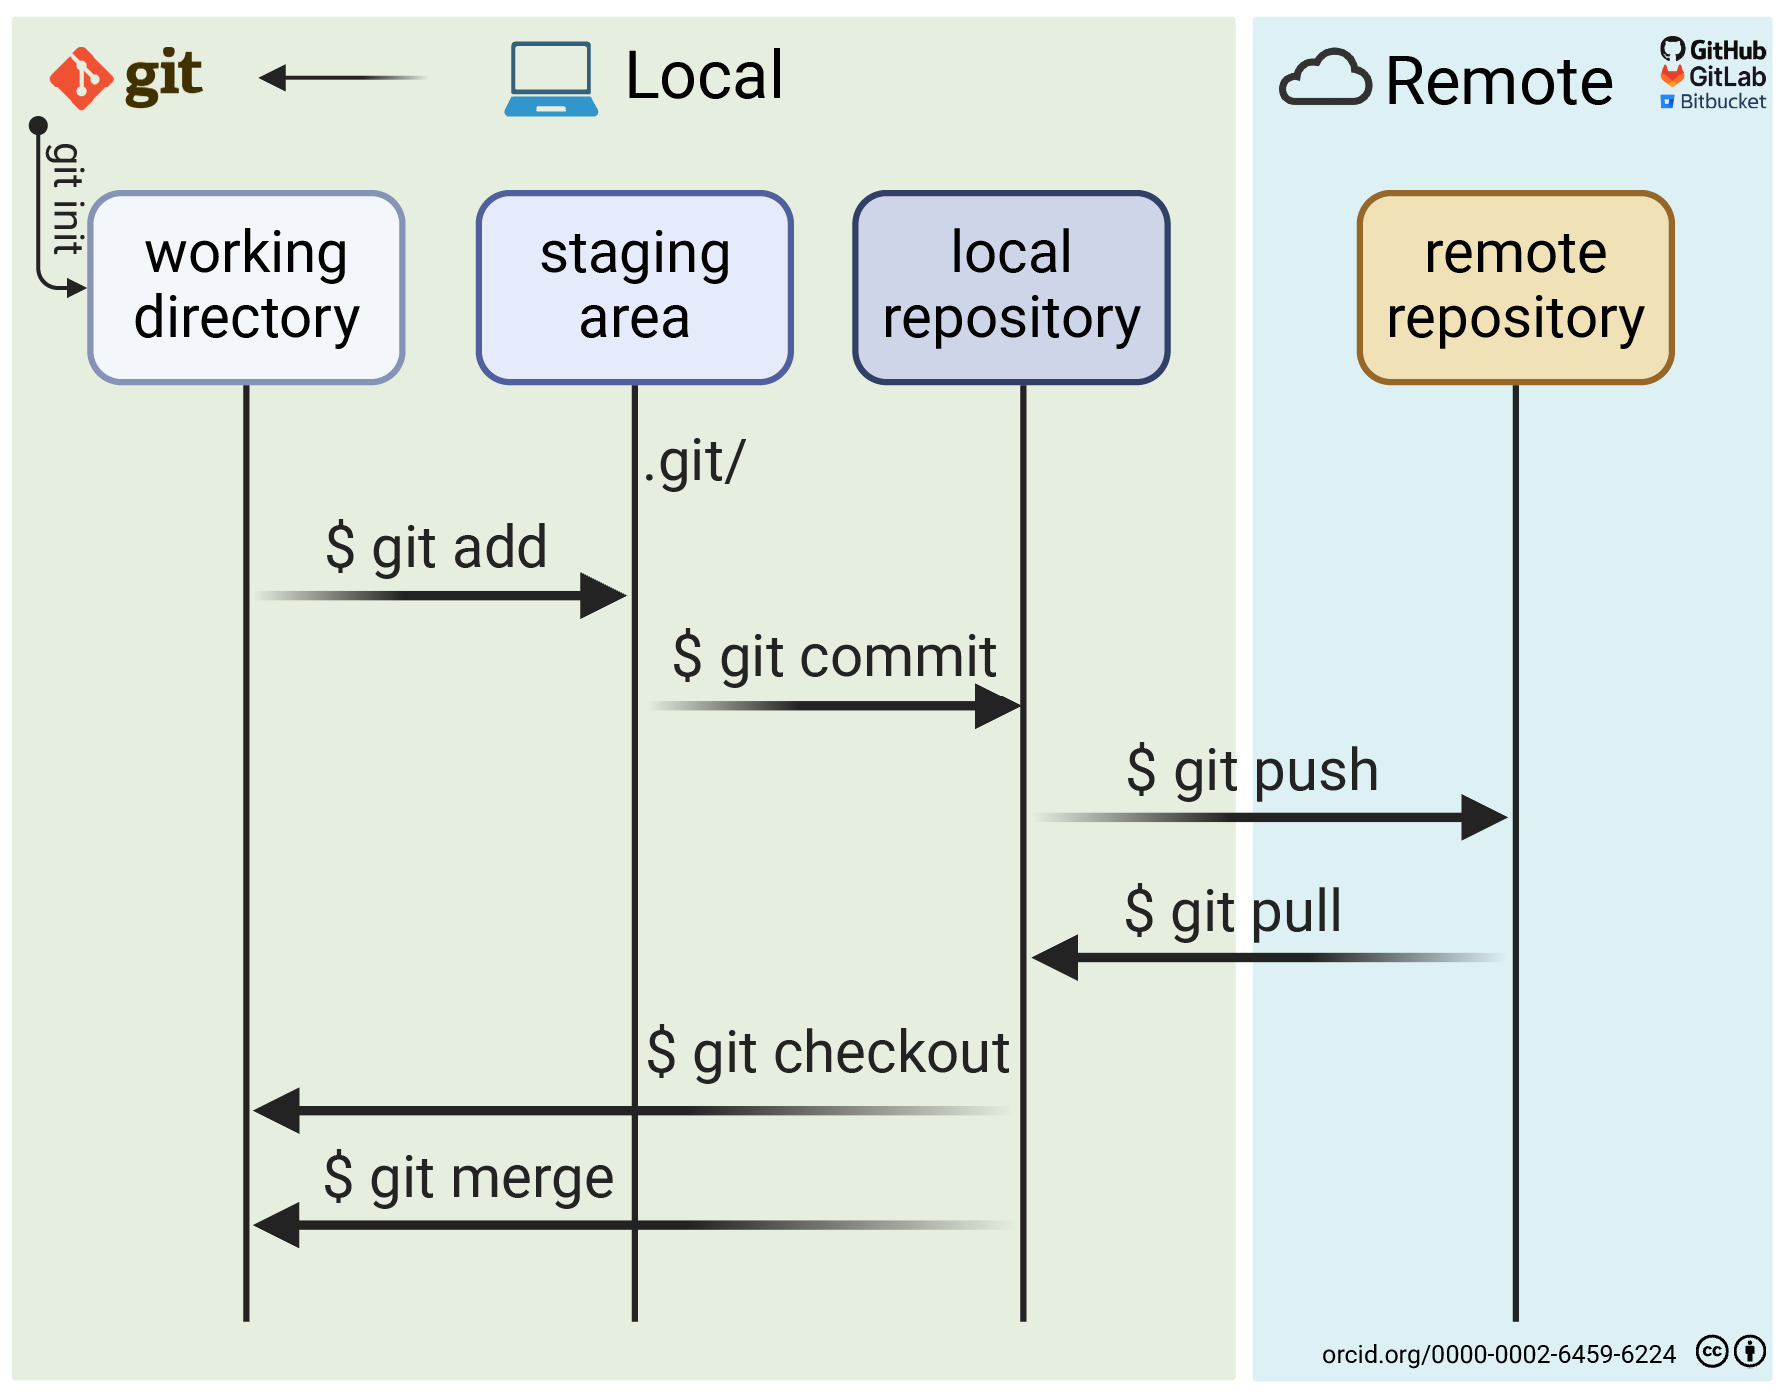
Every copy has the whole history. Four commands move commits between them:
git pushsends your new commits to the remote.git clone URLmakes a new local copy, history included (Try it yourself 2).git fetchdownloads the remote’s new commits without changing your files;git log --oneline --allthen shows them, onorigin/main.git pullis a fetch followed by a merge into the branch you are on: it brings your copy up to date.
A course project can start private and become public when you publish (lesson 12). Either way, never commit passwords, tokens or personal data: removing something from Git history later is hard.
7. Branches
A branch is a separate line of work. You keep main working while you try something on a branch, and merge it when it is ready.
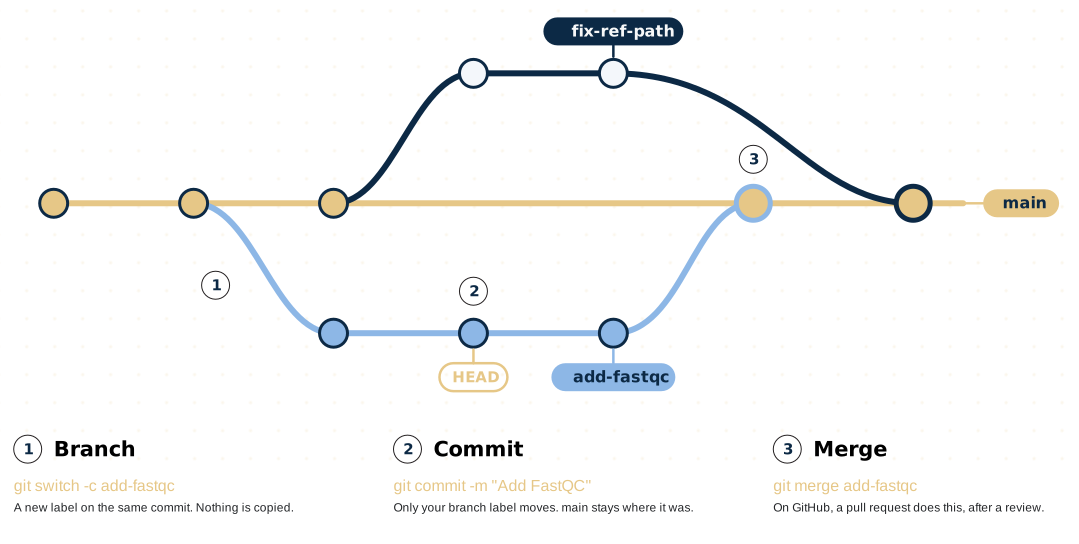
add-fastqc and fix-ref-path gain commits, main stays where it is. Each branch is merged back when its work is ready.
Each dot in the figure is a commit. A branch is not a copy of your files: it is a movable label that points at one commit, and HEAD follows the branch you are on. git switch -c add-fastqc (1) puts a new label on the current commit. Each commit you make (2) moves only that label forward, so main stays untouched and keeps working while you experiment. When the change is ready, a merge (3) brings it into main. On GitHub you do this through a pull request, so a teammate can review it first.
Try it with a decision log, a file that records analysis choices and why you made them. Make a branch:
git switch -c add-decision-logCreate docs/decisions.md in your editor with this content:
docs/decisions.md
# Decision log

- Variant filter: minimum read depth 2 (the vcfutils.pl default, as in the Data Carpentry lesson).
git add docs/decisions.md
git commit -m "Start a decision log"
git log --oneline --graph --all* b66eaaa (HEAD -> add-decision-log) Start a decision log
* e30b49e (origin/main, main) Start analysis notes
* 7e0af94 Mention trimming and subsampling in the metadata
* a119186 Say what the project is for in the README
* 131b0d8 Create LTEE project with data download and metadataOnly the add-decision-log label moved; main (and origin/main, the last state you pushed) still point at the commit before. Merge the branch into main and delete it:
git switch main
git merge add-decision-log
git branch -d add-decision-log
Updating e30b49e..b66eaaa
Fast-forward
docs/decisions.md | 3 +++Fast-forward: main had not moved since you made the branch, so Git only moved the main label forward to your commit. The history stays one straight line. When both branches have new commits, Git joins them with a merge commit, as in the next step. (The figure draws every merge as a join, because GitHub’s Merge pull request button always makes a merge commit.) git branch -d deletes only the label: the commit is now on main.
8. A merge conflict
When two branches change the same line differently, Git cannot decide for you. Here two teammates, Ada and Ben, both change the depth threshold. You play both of them, on your laptop; in a real team each would work on their own computer, and the conflict would appear when the second one’s work is merged.
The shortcut git commit -am "MESSAGE" stages every tracked file that changed and commits it in one step. It does not add new files.
First Ada, on her branch:
git switch -c depth-5In docs/decisions.md, change the filter line. The file is now:
docs/decisions.md
# Decision log

- Variant filter: minimum read depth 5 (Ada: fewer false calls).
git commit -am "Raise minimum depth to 5"
git switch main
git switch -c depth-10Then Ben, on another branch that also starts from main, where the line still says depth 2. Change it to his version:
docs/decisions.md
# Decision log

- Variant filter: minimum read depth 10 (Ben: about the mean depth of these data).
git commit -am "Raise minimum depth to 10"
git switch main
git merge depth-5Ada’s branch is a fast-forward: main now points at her commit. Ben’s branch started from the old main and changes the line Ada changed:
git merge depth-10Auto-merging docs/decisions.md
CONFLICT (content): Merge conflict in docs/decisions.md
Automatic merge failed; fix conflicts and then commit the result.Nothing is lost. If you want to stop and think, git merge --abort puts everything back as it was before git merge. Otherwise, open the file. Git has written both versions into it:
# Decision log

<<<<<<< HEAD
- Variant filter: minimum read depth 5 (Ada: fewer false calls).
=======
- Variant filter: minimum read depth 10 (Ben: about the mean depth of these data).
>>>>>>> depth-10
Between <<<<<<< HEAD and ======= is the version on the branch you are on (main, with Ada’s change); between ======= and >>>>>>> depth-10 is the version from the branch you are merging. Resolve the conflict by writing the version you agree on, without the markers. This is a scientific decision, not a Git one: talk to Ben. Here the team keeps both thresholds for now, because the question of the project is exactly which one to trust (lesson 09). Replace the whole file with:
docs/decisions.md
# Decision log

- Variant filter: report results at minimum read depth 2 and 10, and decide which to keep
  once we can compare them (Ada wanted 5 to reduce false calls; Ben 10, about the mean depth).
git add docs/decisions.md
git commit -m "Resolve depth threshold: compare 2 and 10"
git log --oneline --graph -5* 15b653d (HEAD -> main) Resolve depth threshold: compare 2 and 10
|\
| * 74d8bd0 (depth-10) Raise minimum depth to 10
* | a943ec9 (depth-5) Raise minimum depth to 5
|/
* b66eaaa Start a decision log
* e30b49e (origin/main) Start analysis notesThis time both branches had new commits, so the resolution is a merge commit with two parents: the history keeps both lines. Delete the merged branches and push:
git branch -d depth-5 depth-10
git push
9. Pull requests and the Reproduce check
From now on, every lesson ends with a branch and a pull request (PR) on GitHub, even if you work alone: it gives you a page that shows the change, a place for comments, and automatic checks. This is how most open-source and lab code is reviewed.
Start a branch and make a change on it: tell readers of the README how to get the data (in your editor, or with the printf line below).
git switch -c lesson-04-readme
printf '\n## Get the data\n\n    pixi exec python scripts/download_data.py\n' >> README.md
git commit -am "Say how to get the data in the README"
git push -u origin lesson-04-readme
Before you open the pull request, look at what GitHub will run on it. The template put a workflow in .github/workflows/reproduce.yml:
cat .github/workflows/reproduce.ymlOn every push and pull request (on:), GitHub starts a fresh Linux machine (runs-on: ubuntu-latest), clones your repository, rebuilds the environment from pixi.lock (locked: true fails if the lock file is out of date), runs pixi run reproduce, and checks that the run changed no committed file. For now reproduce only prints “Nothing to reproduce yet”, so the check is green but proves little. In lesson 05 you make it download the data and run the pipeline on that fresh machine: then a green check means your project reproduces from a clean clone.
Then, on GitHub:
- Click Compare & pull request. Write what the change does and why, then Create pull request.
- Look at the Files changed tab. In a team, a colleague reviews here.
- Look at the checks: Reproduce runs. Click Details to read its log.
- When the check is green, Merge pull request, then delete the branch.
With the GitHub CLI (step 6), gh pr create --fill does step 1 from the terminal.
Back on your laptop, bring main up to date. git pull fetches the merge commit GitHub made:
git switch main
git pull
Working without GitHub? Merge on your laptop instead. After a git pull this changes nothing (Git says Already up to date):
git merge lesson-04-readme
git push
The branch is merged, so delete your copy of it. git fetch --prune also removes origin/lesson-04-readme, the branch you deleted on GitHub:
git branch -d lesson-04-readme
git fetch --pruneTry it yourself
Which commit last changed
docs/decisions.md, and what did it say before?TipSolutiongit log --oneline -- docs/decisions.mdlists the commits;git show HASH~1:docs/decisions.mdprints the file as it was one commit earlier (replaceHASHwith the commit ID).Clone your repository into a new folder, as a colleague would, and check that the data is not there but can be downloaded.
TipSolutioncd ~/cbio7501 git clone git@github.com:ada-lovelace/ltee-project.git ltee-project-clone ls ltee-project-clone/data/raw cd ltee-project-clone pixi exec python scripts/download_data.py --verify-only || echo "data not downloaded yet, as expected" cd ~/cbio7501 && rm -rf ltee-project-cloneOnly
README.mdis indata/raw/.pixi exec python scripts/download_data.pywould fetch the rest; from lesson 05 on, the GitHub Action does exactly that.
Break it: delete your work, then get it back
Disaster: you delete the download script and the sample sheet, and even commit the deletion.
cd ~/cbio7501/ltee-project
git rm -q scripts/download_data.py metadata/samples.tsv
git commit -m "Clean up (oops)"
ls scripts metadata
The files are gone from the folder and from the latest commit. They are not gone from history. Ask Git for the last commit that touched the script: it is the commit that deleted it.
git log --oneline -1 -- scripts/download_data.pyde58641 Clean up (oops)The files are still in the commit before that one. HASH~1 means “the commit before HASH”, so you could restore them from de58641~1 (use your ID). Here the deletion is also your latest commit, HEAD, so HEAD~1 is the same commit:
git restore --source=HEAD~1 scripts/download_data.py metadata/samples.tsv
git status --short
?? metadata/samples.tsv
?? scripts/download_data.py?? means untracked: the files are back in your folder, but the latest commit says they are deleted. Commit them again:
git add scripts/download_data.py metadata/samples.tsv
git commit -m "Restore download script and sample sheet"
Without Git, this was a lost afternoon (or a lost thesis). The only work Git cannot give back is work you never committed, so commit small and often, and push.
git restore FILE (without --staged) throws away uncommitted changes to FILE. Use it on purpose.
| Situation | Command | What happens |
|---|---|---|
| You changed a file and want the last committed version back | git restore FILE |
the change is lost |
| You staged a change by mistake | git restore --staged FILE |
the change leaves the stage and stays in the file |
Uncommitted changes stop git switch or git pull |
git stash, later git stash pop |
the changes are put aside, then brought back |
| The last commit is wrong and not pushed yet | fix the files, git add them, then git commit --amend |
the last commit is replaced (this also fixes its message) |
| A commit you already pushed was wrong | git revert HASH |
a new commit undoes it; the history keeps both |
| A commit deleted a file | git restore --source=HASH~1 FILE |
the Break it above |
Do not amend a commit you have pushed: GitHub would then have a commit your copy no longer has, and your next push is rejected. Use git revert instead.
Troubleshooting
| Problem | What to do |
|---|---|
Please tell me who you are |
Run the git config --global commands in step 1. |
Permission denied (publickey) on push |
Your SSH key is not set up or not added to GitHub: see lesson 00; test with ssh -T git@github.com. Or use the HTTPS route in step 6. |
Support for password authentication was removed on push |
GitHub does not take your password in the terminal. Use SSH, or gh auth login (step 6). |
error: src refspec main does not match any |
You have no commits yet, or your branch is called master: run git branch and push the name it shows. |
! [rejected] main -> main (fetch first) |
GitHub has commits you do not have (for example a merged PR). Run git pull, then push again. |
fatal: not a git repository |
You are not in the project folder: cd ~/cbio7501/ltee-project. |
Git wants to commit data/raw/... or .pixi/ |
Your .gitignore is missing or was changed; compare with the template’s. If already staged: git rm -r --cached data/raw (keeps the files on disk). |
CONFLICT (content) and you are not ready to resolve it |
git merge --abort puts everything back as it was before the merge. |
Your local changes to the following files would be overwritten on git switch or git pull |
Commit the changes first, or put them aside with git stash and bring them back with git stash pop. |
error: the branch '...' is not fully merged after a pull request |
The PR was merged with Squash and merge or Rebase and merge, which make new commits. Check on GitHub that it is merged, then delete the branch with git branch -D. |
An editor opens with strange text after git commit or git merge |
Git wants a message. In vim: type :wq and Enter. Set a friendlier editor with git config --global core.editor "nano". |
The Reproduce check fails with lock file not up-to-date |
pixi.lock is missing or older than pixi.toml: run pixi lock, commit pixi.lock, push. |
| The Reproduce check fails on GitHub but works on your laptop | Something is on your laptop that is not in the repository. That is the point of the check: read its log. |
Apply it to your own project
Put your own project under Git and on GitHub the same way: commit the data download script, not the data, and open one pull request. The repository can be private if your research is not public yet; add the instructor as a collaborator. In lesson 05 you give its reproduce task real work.
Key points
git addstages,git commitrecords a snapshot with a message;git status,git diffandgit diff --stagedtell you where you are.- Commit what people write; ignore what programs download or rebuild (
.gitignore). - History lets you see any past version and restore deleted work, as long as it was committed.
- Branches are labels. A merge fast-forwards when only one side moved, and makes a merge commit when both did; conflicts are decisions you resolve by editing (or leave with
git merge --abort). - GitHub adds remotes, pull requests and Actions; the Reproduce check runs on every push and gets real work in lesson 05.
Further reading
- Cheat sheet: Git and GitHub, with links to the official cheat sheets and references.
- Pro Git book (free, CC BY-NC-SA, read online): https://git-scm.com/book/en/v2
- NBIS, Version control with Git, including the extra material on rebasing, the reflog and aliases: https://nbisweden.github.io/workshop-reproducible-research/pages/git.html
- GitHub Docs, About pull requests: https://docs.github.com/en/pull-requests/collaborating-with-pull-requests/proposing-changes-to-your-work-with-pull-requests/about-pull-requests
- GitHub Docs, Understanding GitHub Actions: https://docs.github.com/en/actions/about-github-actions/understanding-github-actions
- Perez-Riverol Y et al. (2016). Ten simple rules for taking advantage of Git and GitHub. PLoS Comput Biol 12:e1004947. https://doi.org/10.1371/journal.pcbi.1004947